Wednesday, August 26, 2015

Pointers and Arrays in C - The story of George St


Arrays and Pointers in C-programming are 2 different types used in a similar manner.

To make an analogy, let’s assume that  there is a street called George street. Buildings are built along the street.


The original plan is that every house takes up the same space (1 unit) and each is assigned a street number. The next house has a street number incremented by 1 from the previous one.


So the street number for houses along the street will be 1, 2, 3, 4 … 249, 250. When people want to build a house or go to a friend’s house to pick up something, they ask for the street number and go to the address accordingly.


This works pretty well for a while.


However, a few years later, this suburb is re-zoned for both residential and business uses.


Since then, warehouses have been built in this area. Unlike normal houses, the warehouse takes up twice as much space as a normal house, which is 2 unit of space.


Buildings are no longer the same size, you can’t assume that each street number represents a house anymore.


As a result, people can’t just ask for an address and use that unit of space without telling the planner what type of the building they are planning to build or visiting.


For example, a warehouse is built in the space which was originally planned for house number 204 and 205.


When people apply to build a warehouse starts from number 204,  the land planner writes down that warehouse is assigned street number 204 and it has the size of 2 unit of space.


So we know that the space for street number 204 and 205 are taken since the warehouse has a size of 2 unit of space.


Next time, they have to start from street number 206 to build something else.

A pointer is like a street number from which you can find the address and the type of building or space you want to use. A pointer must have a type or otherwise you don’t know how much space you can use or how big is the building.


When people want to use some space or to visit a building, they go to the land planner and tell him the street number and the type of building they want to visit or plan to build. The land planner gives them a key with a tag, which has the type of building and the starting street number written on it.


Worth mentioning is that: this key can open any door on George Street.


Once the key and street number is given to you, you can feel free to go to the next door and the next door or the previous door … literally you can go wherever you like and do some doggy things in other people’s houses. But the result may not be what you want.

In some situations, you might want to use 3 warehouses in a row.


You can ask the planner to give you an array of 3 warehouses.


He will give you a key with a tag. On the tag it says: starting address 204; type: warehouse: number of elements: 3.


So you know that you can find the first warehouse by going to the address 204, since each warehouse takes up 2 unit of space, the next one will be at address 206 and the next one will be at 208.


Although there is nothing to stop you from going over the boundary of the space assigned to you, you might not want to do so as there might be serious consequences.


Unlike pointer, the address, type, and number of elements of an array cannot be changed as it is the key for you to find all 3 warehouses.  


Tuesday, August 25, 2015

onActivityResult called whenever the starting Activity instance is resumed

If Activity A starts another Activity B by calling the method startActivityForResult(...).

Whenever the same Activity A instance is resumed, the onActivityResult of A is called.

If Activity B starts a new instance of Activity A, then the onActivityResult(...) method is not call.

For example, if Activity B calls startActivity and start a new instance of Activity A on top of the task stack.
Intent startMainActivity = new Intent(this, MainActivity.class);
startActivity(startMainActivity);

The onActivityResult(...) is not called.

But if Activity B starts the same instance of Activity A by using the FLAG_ACTIVITY_CLEAR_TOP and FLAG_ACTIVITY_SINGLE_TOP flags in the intent.

setResult(Activity.RESULT_OK);
Intent startMainActivity = new Intent(this, MainActivity.class);
startMainActivity.addFlags(Intent.FLAG_ACTIVITY_CLEAR_TOP);
startMainActivity.addFlags(Intent.FLAG_ACTIVITY_SINGLE_TOP);
startActivity(startMainActivity);


Then the onActivityResult(...) is called.

However, the resultCode you passed in through method setResult(...) in Activity B will not be passed through Activity A if A is started by an Intent.

Although the onActivityResult(...) is called, but the resultCode is still 0 (RESULT_CANCELED)

Only if we finish Activity B and expose Activity A on to the top of task stack will pass the resultCode -1 (RESULT_OK) to onActivityResult(...) in Activity A.

setResult(Activity.RESULT_OK);
finish();


Monday, August 10, 2015

How to import an existing Android Studio Project as a Library Module (Step-by-step guide)

In the situation where we have 2 Android Studio projects and we want to use one as a library project which is to be imported to another project as a module. We can easily do that with Android Studio.


Let's assume that we have 2 projects: MyApplication and MyLibrary and we want to import MyLibrary project into MyApplication as a module.


The first thing we need to do is to find the build.gradle file in the module that we want to import from MyLibrary project, which is usually in the app directory unless you changed the name of the module

MyLibrary
      |__app 
             |___build.gradle


 Notice that the build.gradle file plugin is the 'com.android.application' plugin. To use this project as a library project, we need to apply the 'com.android.library' plugin. The file will be like this:


Try to sync the project, an error will occur: Library projects cannot set applicationId.


We can fix that by removing the applicationId line in the gradle file, inside defaultConfig brackets.


That's all for the MyLibrary project. 
Next we move on to the MyApplication project to import MyLibrary as a module.
Go to MyApplication project, click File -> New -> Import Module.


An dialog appears


Navigate to the directory of the Module you want to import from the MyLibrary project. Usually it's the app module unless you've given it another name.


An error will occur if there is a Module in MyApplication project with the same name. To import an updated module from a library project, we can give it a version number in the Module name setting here. 


Change the name of the module to my-library, imported successfully.


Almost there, the last step is to fix the dependencies in MyApplication project. Many people forget to do this.

Start the Project Structure dialog, select the app module(can have another name), and click the dependencies tab on the right side.


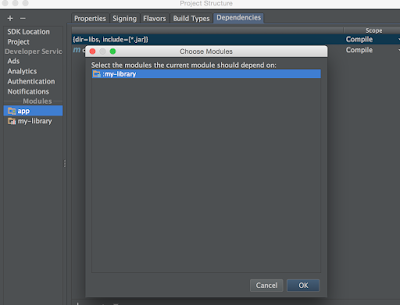
Find the plus button and click it, select module dependency on the pop-out menu.


and then select the library module we just imported from MyLibrary project.


Click OK, and it's all done.

What the IDE does for you is to add the dependency in MyApplication/app/build/gradle file.

MyApplication
      |__app 
             |___build.gradle

The dependencies section looks something like this:


dependencies {
    compile fileTree(dir: 'libs', include: ['*.jar'])
    compile 'com.android.support:appcompat-v7:22.2.0'    
    compile project(':my-library')
}


It might work just fine, but there is potentially a problem, the MyLibrary project has its own dependencies. For example, both MyApplication and MyLibrary can be using support libraries, which might have version conflicts.

We can avoid this by configuration transitive dependencies in gradle.
We can change the line


compile project(':my-library')


to

compile(project(':my-library')){
    transitive=false;
}


This issue will be avoid. Done!


That's all. Happy coding!