Let's assume that we have 2 projects: MyApplication and MyLibrary and we want to import MyLibrary project into MyApplication as a module.

The first thing we need to do is to find the build.gradle file in the module that we want to import from MyLibrary project, which is usually in the app directory unless you changed the name of the module
MyLibrary
|__app
|___build.gradle

Notice that the build.gradle file plugin is the 'com.android.application' plugin. To use this project as a library project, we need to apply the 'com.android.library' plugin. The file will be like this:

Try to sync the project, an error will occur: Library projects cannot set applicationId.


That's all for the MyLibrary project.
Next we move on to the MyApplication project to import MyLibrary as a module.
Go to MyApplication project, click File -> New -> Import Module.
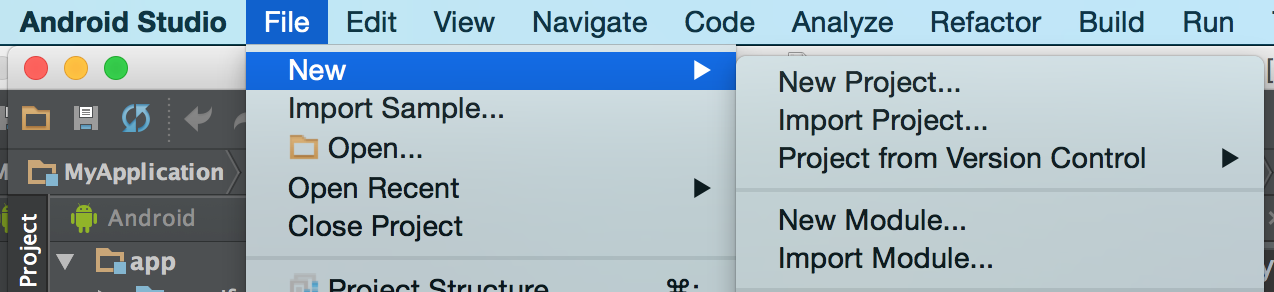
An dialog appears

Navigate to the directory of the Module you want to import from the MyLibrary project. Usually it's the app module unless you've given it another name.

An error will occur if there is a Module in MyApplication project with the same name. To import an updated module from a library project, we can give it a version number in the Module name setting here.

Change the name of the module to my-library, imported successfully.

Almost there, the last step is to fix the dependencies in MyApplication project. Many people forget to do this.
Start the Project Structure dialog, select the app module(can have another name), and click the dependencies tab on the right side.

Find the plus button and click it, select module dependency on the pop-out menu.

and then select the library module we just imported from MyLibrary project.

Click OK, and it's all done.
What the IDE does for you is to add the dependency in MyApplication/app/build/gradle file.
MyApplication
|__app
|___build.gradle
The dependencies section looks something like this:
dependencies {
    compile fileTree(dir: 'libs', include: ['*.jar'])
    compile 'com.android.support:appcompat-v7:22.2.0'
    compile project(':my-library')
}
It might work just fine, but there is potentially a problem, the MyLibrary project has its own dependencies. For example, both MyApplication and MyLibrary can be using support libraries, which might have version conflicts.
We can avoid this by configuration transitive dependencies in gradle.
We can change the line
This issue will be avoid. Done!
We can avoid this by configuration transitive dependencies in gradle.
We can change the line
compile project(':my-library')
to
compile(project(':my-library')){
    transitive=false;
}
This issue will be avoid. Done!

That's all. Happy coding!
No comments:
Post a Comment